Shopify is a top e-commerce platform that enables businesses to effortlessly set up online stores. Whether you have a small business or a large corporation, Shopify offers a range of tools to help you manage products, handle payments, and customize your online store. Today, there are more than 5 million Shopify stores on the internet, and it is undoubtedly one of the most popular platforms for selling products online.
What are Shopify Apps?
Shopify apps offer additional tools or functionalities that are otherwise not available to the Shopify store owner. They enhance the capabilities of a Shopify store in many ways.
Store owners can browse and install these apps from Shopify App Store. Developers can also create custom apps catering specific requirements.
Shopify apps are mostly used to:
- Automate repetitive tasks, such as inventory management.
- Improve customer experience with features like live chat or personalized product recommendations.
- Integrate third-party services, such as marketing tools or payment gateways.
Ruby on Rails, React and Polaris
We are using these technologies in particular because of their simplicity and efficiency.
Rails’ conventions allow developers to build applications quickly, and the Shopify ecosystem integrates well with Rails, thanks to gems like shopify_app that streamline authentication and API usage.
We are using React and Polaris for user interface. Shopify Polaris provides pre-built React components that match Shopify’s design guidelines, ensuring a seamless experience for merchants.
Tools and Versions
For this blog series, we’ll be using:
- Ruby: Version 3.3.6
- Rails: Version 8.0.1
- React: Latest version
- Shopify Polaris: Latest version
This ensures compatibility with the latest Shopify APIs and provides the best developer experience.
.……………………
Creating a Shopify App in a Shopify Partner Account
Step 1: Sign Up for a Shopify Partner Account
- Visit the Shopify Partners website.
- Click on Sign Up and complete the sign-up process by providing your details.
- Once signed up, you will have access to the Partner Dashboard.
Step 2: Create a New App
- Navigate to the Apps section in the Partner Dashboard.
- Click on Create App and click Create App Manually.
- Provide a name for your app and select the development store where you want to test it.
Step 3: Configure API Keys
- After creating the app, Shopify will provide API keys and secrets.
- Note these credentials, as they will be required for your Ruby on Rails application.
.……………………
Using ngrok for Tunneling
Why Use ngrok?
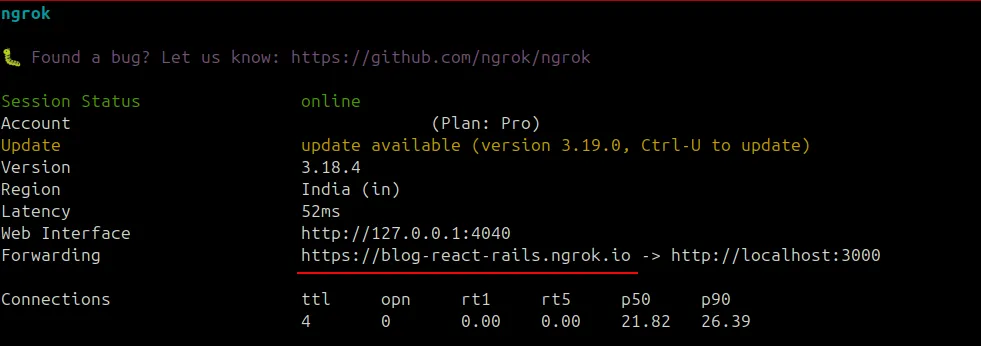
Ngrok allows you to expose your local development server to the internet securely. This is essential for Shopify apps, as Shopify needs to communicate with your app during development.
Setting Up ngrok
- Download and install ngrok from ngrok’s website.
- Authenticate ngrok by running:
ngrok authtoken YOUR_AUTH_TOKEN
- Start ngrok with the following command:
ngrok http 3000
Replace 3000 with the port number your Rails application is running on.

Updating Shopify App Settings
- Copy the HTTPS URL provided by ngrok.
- Go to your app configuration in the Shopify Partner Dashboard.
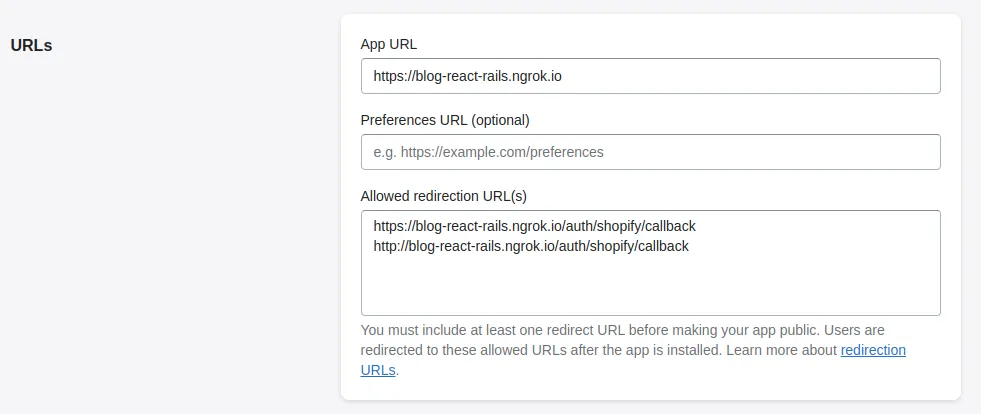
- Update the App URL and Redirect URLs with the ngrok URL.

.……………………
Step 1: Setting Up the Rails App
Open your terminal and run the following command to create a new Rails app with PostgreSQL as the database:
rails new blog_react_rails_shopify -d postgresql
This creates a new Rails application named blog_react_rails_shopify.
Navigate into the project directory:
cd blog_react_rails_shopify
Run database migrations to set up the initial database schema:
rails db:migrate
Step 2: Adding Shopify Functionality
Add the shopify_app gem to your application:
bundle add shopify_app
Generate Shopify app files:
rails generate shopify_app
This will create necessary controllers, routes, and configurations for your Shopify app.
Run migrations again to apply changes:
rails db:migrate
Step 3: Adding Environment Variable Management
Add the dotenv-rails gem to manage environment variables:
bundle add dotenv-rails
Create a .env file in the root of your project and add your Shopify app credentials:
SHOPIFY_API_KEY="YOUR_API_KEY"
SHOPIFY_API_SECRET="YOUR_SECRET_API_KEY"
SHOPIFY_APP_URL="ngrok_URL" // blog-react-rails.ngrok.io
HOST="ngrok_HTTPS_URL" // https://blog-react-rails.ngrok.io
Step 4: Configuring the App
- Open the
config/initializers/shopify_app.rbfile. - Comment out the line:
config.new_embedded_auth_strategy = true
This disables the new embedded authentication strategy, ensuring compatibility.
Step 5: Starting the Rails Server
Start the Rails development server:
rails s
Open your browser and navigate to the app’s login page with ngrok’s HTTPS URL:
https://blog-react-rails.ngrok.io/login
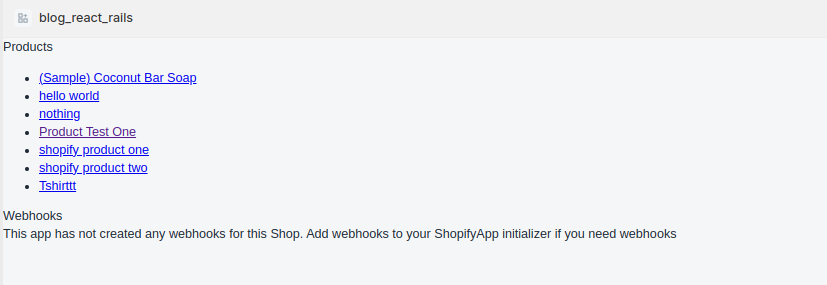
Log in and install the app into your Shopify store.

After you’ve successfully installed, you’ll lead to this:

.……………………
Setting Up React and Polaris in Rails
To create a seamless Shopify app with React for the frontend and Rails as the backend, follow these steps:
1. Add Required Gems
Add the following gems to your Gemfile and run bundle install:
gem "react-rails"
gem "jsbundling-rails"
After installation, initialize Esbuild:
bin/rails javascript:install:esbuild
2. Install React, Polaris, and App Bridge
Use Yarn to add these essential libraries:
yarn add react react-dom @shopify/polaris @shopify/app-bridge-react @shopify/app-bridge @shopify/app-bridge-utils
3. Configure Esbuild
Create an esbuild.config.js file in the root of your project and add the following code to bundle JavaScript:
import esbuild from "esbuild";

const ctx = await esbuild.context({
  entryPoints: ["app/javascript/application.jsx"],
  bundle: true,
  sourcemap: true,
  format: "esm",
  outdir: "app/assets/builds",
  publicPath: "/assets",
  loader: {
    ".js": "jsx",
    ".jsx": "jsx",
  },
});

if (process.argv.includes("--watch")) {
  await ctx.watch();
} else {
  await ctx.rebuild();
  process.exit(0);
}re
4. Prepare JavaScript Files
- Comment out any existing code in
application.js - Rename
app/javascript/application.jstoapplication.jsx. - Create components folder i.e.
app/javascript/components
5. Update package.json File
"scripts": {
    "build": "node esbuild.config.js",
    "build:css": "sass ./app/assets/stylesheets/application.sass.scss:./app/assets/builds/application.css --no-source-map --load-path=node_modules"
  },
6. Create a Root Component
Build your application.jsx to integrate Shopify Polaris and App Bridge:
import React from "react";
import { AppProvider } from "@shopify/polaris";
import createApp from "@shopify/app-bridge";
import { createRoot } from "react-dom/client";
import HelloWorld from "./components/HelloWorld";

const urlParams = new URLSearchParams(window.location.search);
const host = urlParams.get("host");

const appBridgeConfig = {
  apiKey: "YOUR_API_KEY", // Replace with your actual API key
  host: host,
  forceRedirect: true,
};

document.addEventListener("DOMContentLoaded", () => {
  const container = document.getElementById("react-root");
  const root = createRoot(container);
  const appBridge = createApp(appBridgeConfig);

  root.render(
    <AppProvider>
      <HelloWorld appBridge={appBridge} />
    </AppProvider>
  );
});
7. Develop a HelloWorld Component
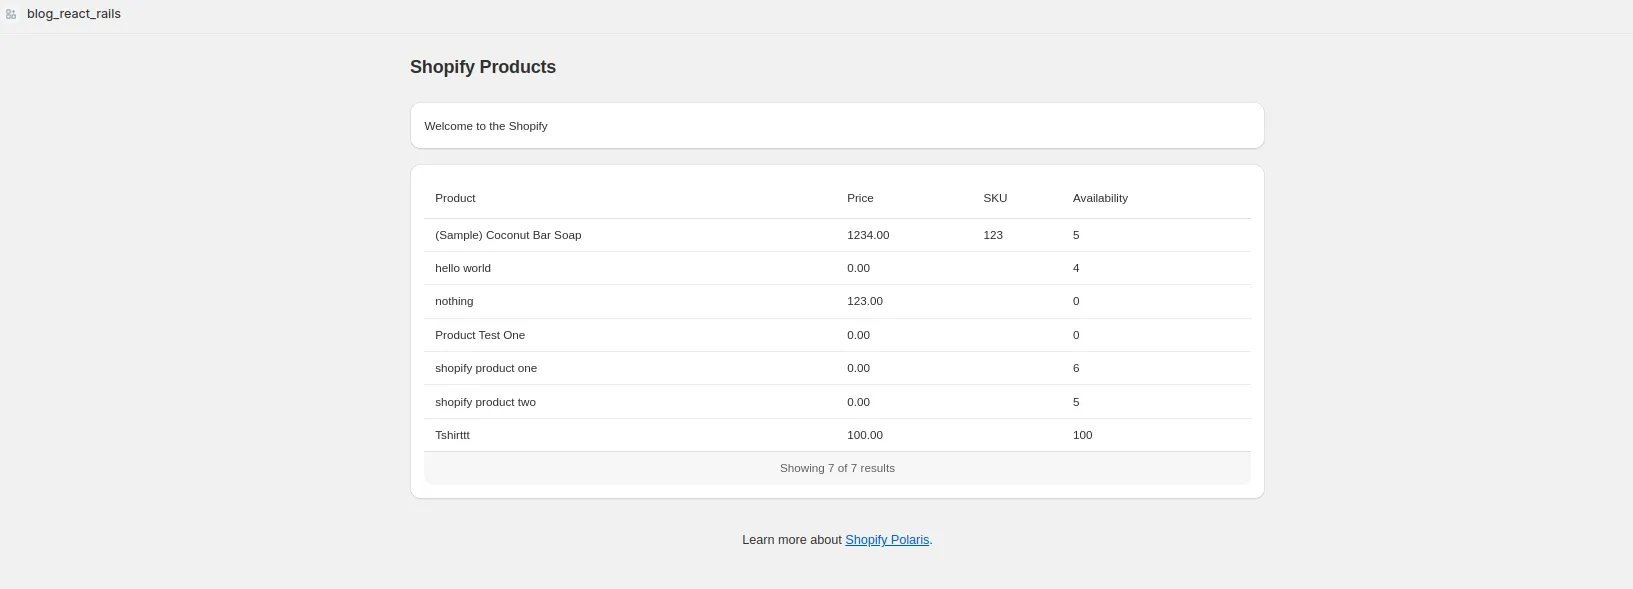
Create a functional component using Shopify Polaris to display products:
import React, { useEffect, useState } from "react";
import {
  Frame,
  Page,
  Layout,
  Card,
  DataTable,
  Spinner,
  FooterHelp,
  Link,
} from "@shopify/polaris";
import { fetchWithSessionToken } from "./fetchWithSessionToken";
import "@shopify/polaris/build/esm/styles.css";

const HelloWorld = ({ appBridge }) => {
  const [loading, setLoading] = useState(true);
  const [products, setProducts] = useState([]);
  const [error, setError] = useState(null);

  useEffect(() => {
    const fetchData = async () => {
      try {
        setLoading(true);
        const apiUrl = "/products";
        const responseData = await fetchWithSessionToken(appBridge, apiUrl);
        setProducts(responseData.products || []);
      } catch (err) {
        setError(err.message);
      } finally {
        setLoading(false);
      }
    };

    fetchData();
  }, [appBridge]);

  if (loading) {
    return (
      <Frame>
        <Page title="Shopify Polaris Demo">
          <Layout>
            <Layout.Section>
              <Card sectioned>
                <Spinner size="large" />
              </Card>
            </Layout.Section>
          </Layout>
        </Page>
      </Frame>
    );
  }

  if (error) {
    return (
      <Frame>
        <Page title="Error">
          <Layout>
            <Layout.Section>
              <Card sectioned>
                <p>{error}</p>
              </Card>
            </Layout.Section>
          </Layout>
        </Page>
      </Frame>
    );
  }

  const rows = products.map((product) => [
    product.title,
    product.variants[0].price,
    product.variants[0].sku,
  ]);

  return (
    <Frame>
      <Page title="Shopify Products">
        <Layout>
          <Layout.Section>
            <Card title="Products" sectioned>
              <DataTable
                columnContentTypes={["text", "text", "text"]}
                headings={["Title", "Price", "SKU"]}
                rows={rows}
              />
            </Card>
          </Layout.Section>
        </Layout>
      </Page>
    </Frame>
  );
};

export default HelloWorld;
8. Fetch Data with Session Token
Create fetchWithSessionToken.jsx for secure API communication:
import { getSessionToken } from "@shopify/app-bridge-utils";

export const fetchWithSessionToken = async (app, url, options = {}) => {
  try
    const token = await getSessionToken(app);

    const headers = {
      ...options.headers,
      Authorization: `Bearer ${token}`,
      "Content-Type": "application/json",
    };

    const response = await fetch(url, {
      ...options,
      headers,
    });

    if (!response.ok) {
      throw new Error(`HTTP error! Status: ${response.status}`);
    }

    return await response.json();
  } catch (error) {
    console.error("Error fetching with session token:", error);
    throw error;
  }
};
9. Integrate React in Rails Views
Remove all the code from index.html.erb:
Update embedded.html.erb:
<!DOCTYPE html>
<html lang="en">
  <head>
    <meta charset="utf-8" />
    <meta name="viewport" content="width=device-width, initial-scale=1" />
    <title>My Shopify App</title>
    <%= csrf_meta_tags %>
    <%= stylesheet_link_tag "application" %>
  </head>
  <body>
    <div id="react-root"></div>
  </body>
</html>
<%= javascript_include_tag 'application', 'data-turbo-track': 'reload' %>

This completes your React on Rails Shopify app setup. You’ve now integrated Shopify Polaris with Rails, enabling a modern React-based frontend. The app is ready to handle Shopify Admin requests securely and provide a seamless user experience.
If you’re exploring further, consider enhancing your app with dynamic routing or additional Shopify APIs!
For practical tips, you can book a free consulting session with our Shopify expert.
Need help planning your eCommerce platform? Drop us a message.

