Sentry is a self-hosted and cloud-based application monitoring tool that integrates well with the application and helps software teams see underlying issues and quickly solve them. And, in this post, we’ll look at how we can integrate Gurzu hosted sentry in React Native applications.
Firstly, we start with adding a sentry to the project. We can do this by either using npm or yarn
npm install @sentry/react-native --save
# OR
yarn add @sentry/react-native
Next, let’s link sentry to the native project as sentry also supports native crashes and we do this as follows,
For react-native >= 0.60, with yarn
# For self-hosted
SENTRY_WIZARD_URL=https://sentry.gurzu.net/ yarn sentry-wizard -i reactNative -p ios android

# For sentry service itself
yarn sentry-wizard -i reactNative -p ios android

# Later for iOS
cd ios
pod install
As we can see, sentry SDK supports auto-linking and iOS relies on CocoaPods, so you need to install the necessary dependencies. More information on the process of installing CocoaPods can be found here.
For react-native < 0.60,
react-native link @sentry/react-native
So what’s happening here,
- The sentry-wizard call will patch your project accordingly. This will guide you through the process of setting everything up correctly. This has to be done only once, and the files created can go into your version control system.
- As we have hosted sentry on our Gurzu domain, we are using https://sentry.gurzu.net/ as a wizard URL.
iOS Specifics
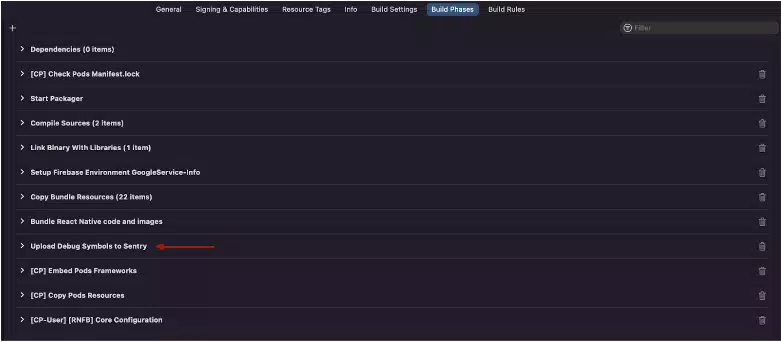
For the iOS platform, you can hook directly into the build process to upload debug symbols and source maps. However, if you are using bitcode, you will need to disable the “Upload Debug Symbols to Sentry” build phase and then separately upload debug symbols from iTunes Connect to Sentry. For configuring without using bitcode, sentry-wizard should have taken care of necessary stuff, but please do verify if a new entry is there on “Build Phases”.
Android Specifics
Not much configuration is needed for the Android platform. But, If you have enabled Gradle’s org.gradle.configureondemand feature, you’ll need a clean build, or you’ll need to disable this feature to upload the source map on every build.
To disable this feature, set org.gradle.configureondemand=false or remove it as its default value is disabled, do this in the gradle.properties file.
After successfully installing and configuring the sentry to the react-native project, let’s initiate it. Inside your App.js
import * as Sentry from "@sentry/react-native"

Sentry.init({
  dsn: "https://b*******************f29@sentry.gurzu.net/60",
});
Lastly, let’s verify if everything is running as it should. The following snippet includes an intentional error and hence we can test the working on the sentry.
throw new Error("My first Sentry error!");
Or, try a native crash:
Sentry.nativeCrash();
Here learn more about Sentry Monitoring and tracking application error.
Related Articles
- Sentry - Monitoring and Tracking Application Error
- Integrate Sentry to Rails application
- Getting started with React Native: Core Architecture of React Native
Final Words
Are you interested in learning more about Sentry? Or are you eager to integrate Sentry into your next project, but encountering setup challenges? Gurzu team is dedicated to helping you with software set-up and monitoring using Sentry.
Discover how our mobile development team can create personalized solutions tailored to your business needs. Whether you’re looking to enhance customer engagement, streamline internal processes, or tap into new revenue streams, our experts are here to guide you every step of the way.
Don’t miss out on the mobile revolution! Click here to explore our mobile development services and kick-start your journey towards success.