“YOLO” this word is something special. If you ask a general person the meaning of this word, you would probably get something like “YOU ONLY LIVE ONCE,” but if you ask a nerd like me, you might get “YOU ONLY LOOK ONCE,” a contradiction of meaning?
It’s actually the domains that determine the meaning of this word. Nevertheless in this article,I will be referencing this as “YOU ONLY LOOK ONCE”. You might be wondering what this means. In the field of AI, YOLO is a state-of-the-art object detection algorithm.
There have been various iterations of this algorithm, but in this article, I will focus on the v3 implementation from Darknet. To learn more about its working principles and how the algorithm localizes objects present in the image, visit darknet’s homepage.
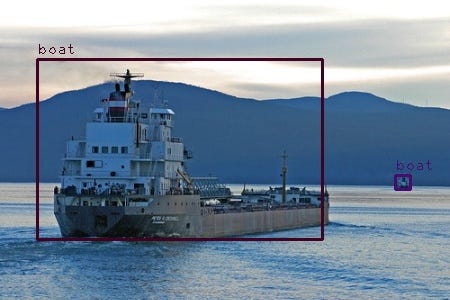
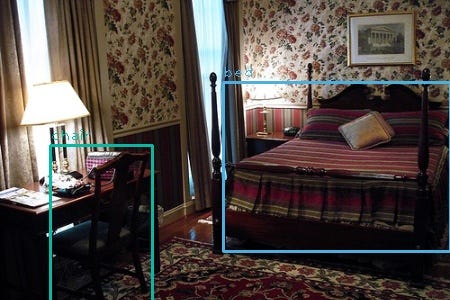
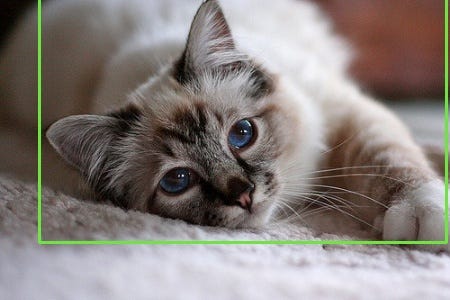
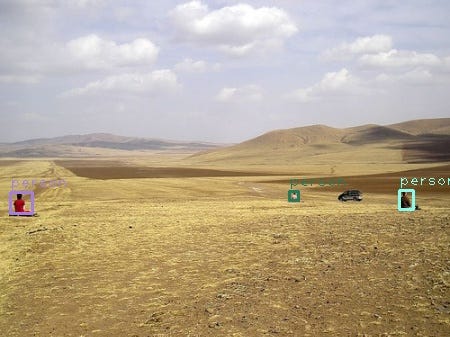
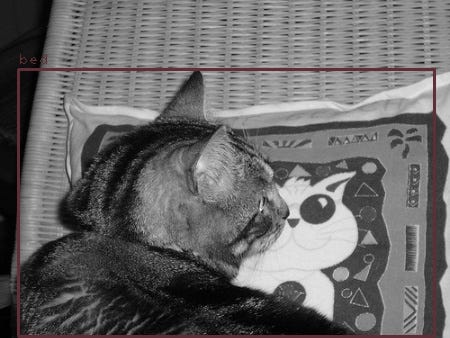
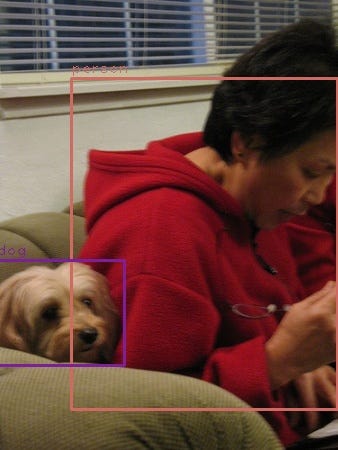
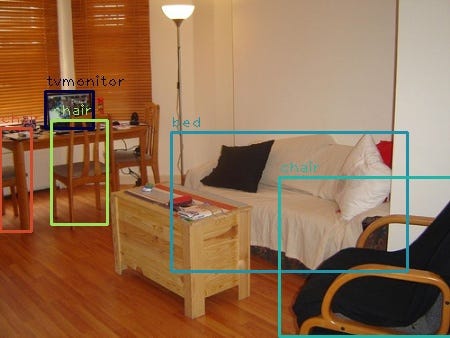
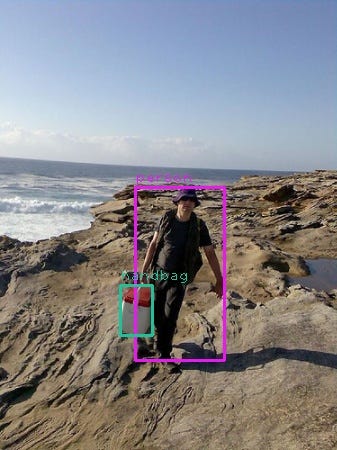
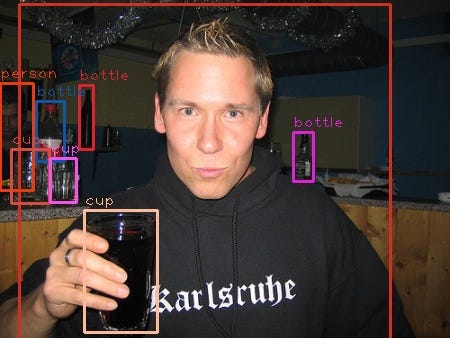
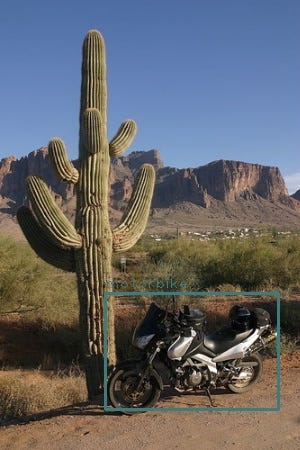
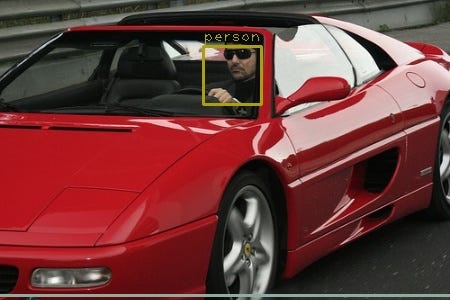
But in brief, when we provide an image to the neural network, it divides an image into various regions where objects are detected with boxes around them. The boxes with higher scores are shown, and the boxes with low scores are suppressed; non max suppression.
Motivation
Everyone knows python for its popularity in AI community. But there are various other languages that we can implement this algorithm. There may not be a huge supporting community for other languages, but there are implementations of Open-CV , TensorFlow etc., for different languages So, so I wanted to try how difficult it would be to implement a simple YOLO v3 algorithm in other languages.
You might also like: Automating Tinder?! Perks Of Being A Programmer
Same as before this article focuses more on the understanding of how the implementation flow rather than explaining the nitty-gritty part of YOLO.
I will be showing and explaining both implementation i.e in Java and python.
Resources
As always, You can find this implementation on my personal GitHub repository GitHub : Download Code
Darknet : Download Weights ,Config Files and Test Images
I have included few of the test images in my repository but feel free to do your thing. Since, weight files are big I have not included them on the GitHub repository. You can download the weights form the above mentioned darknets yolo’s home page.
Python Implementation
So lets get started with the implementation. If you want to see the Java’s Implementation scroll down to Java Implementation.
Requirement: check requirements.txt
Importing Libraries
import cv2
import numpy as np
import os
from datetime import datetime
from pathlib import Path
We will be using open cv’s dnn to load the neural network which will be the common ground for both implementation.
Defining Some Global
current = os.path.dirname(os.path.abspath(__file__))
parent = Path(current).parent
yolo_weights = f'{parent}/Assets/models/yolov3.weights'
yolo_cfg = f'{parent}/Assets/models/yolov3.cfg'
coco_names = f'{parent}/Assets/models/coco.names'
Here we define where the weights , config , classes names are located. Since, there are 80 types of classes it’s better to load this from a file rather than creating an array of gazillion length.
Loading YOLO
def load_yolo():
    net = cv2.dnn.readNet(yolo_weights, yolo_cfg)
    classes = []

    with open(coco_names, "r") as f:
        classes = [line.strip() for line in f.readlines()]

    layers_names = net.getLayerNames()
    unconnected_layer = net.getUnconnectedOutLayers()
    output_layers = [layers_names[i - 1] for i in unconnected_layer]
    colors = np.random.uniform(0, 255, size=(len(classes), 3))
    return net, classes, colors, output_layers
In this function, We take help from OpenCv’s DNN library which facilitates us for loading a neural network from files. The neural network structure is defined on yolov3.cfg and all the weights required to initialize every layer is defined on yolv3.weights.
Along with that we load the number of classes for classification which is 80 classes. We read that from a file for obvious reasons. Lastly, we need reference from where the neural network takes its input and spit out the outputs. This work could be very tedious but thanks to opencv we could do this with few lines of code. We can get the names of all the layers in NN from getLayerNames() and get all the unconnected layers from function namely getUnconnectedOutLayers().
Loading Images
def load_image(path):
    image = cv2.imread(path)
    image = cv2.resize(image, None, fx=0.9, fy=0.9)
    height, width, channels = image.shape
    return image, height, width, channels
So, for a neural network to get some input we need to load the image in a format that a neural network can understand which is of course numbers.
Again , We load the image with the help of OpenCv’s imread function and do some resizing.
Detecting Objects
def detect_object(img, net, outputLayers):
    blob = cv2.dnn.blobFromImage(img, scalefactor=0.00392, size=(608, 608), mean=(0, 0, 0), swapRB=True, crop=False)
    net.setInput(blob)
    outputs = net.forward(outputLayers)
    return blob, outputs
As mentioned previously we provide an image to the neural network and the network divides the images into different small regions for where the object are located. So we take the image that we have loaded previously, then do some pre-processing since our NN architecture only takes image of 608x608 size.
After, We resize the image into the size that our NN can take , we feed it through the NN and the NN spits out the result in a form of confidence, bounding boxes and score of each boxes. More on that later
Getting Box Dimensions
def get_box_dimensions(outputs, height, width):
    boxes = []
    confs = []
    class_ids = []

    for output in outputs:
        for detect in output:
            scores = detect[5:]
            class_id = np.argmax(scores)
            conf = scores[class_id]
            if conf > 0.5:
                center_x = int(detect[0] * width)
                center_y = int(detect[1] * height)
                w = int(detect[2] * width)
                h = int(detect[3] * height)
                x = int(center_x - w / 2)
                y = int(center_y - h / 2)
                boxes.append([x, y, w, h])
                confs.append(float(conf))
                class_ids.append(class_id)

    return boxes, confs, class_ids
After our NN have given an output we need to manually define what kind of boxes could be shown or more over set the threshold of the detected object. Generally YOLO detects everything its our job to filter the object detected. So we iterate over the outputs and here we only take the object that have confidence level of more than 50% i.e 0.5. So all the objects with confidence level greater than 0.5 are added and array of boxes are returned with its confidence level and the category of the object namely class id.
Drawing Labels
def draw_labels(boxes, confs, colors, class_ids, classes, img):
    indexes = cv2.dnn.NMSBoxes(boxes, confs, 0.5, 0.4)
    font = cv2.FONT_HERSHEY_PLAIN
    for i in range(len(boxes)):
        if i in indexes:
            x, y, w, h = boxes[i]
            label = str(classes[class_ids[i]])
            color = colors[i]
            cv2.rectangle(img, (x, y), (x + w, y + h), color, 2)
            cv2.putText(img, label, (x, y - 5), font, 1, color, 1)
    cv2.imwrite(f'{parent}/outputimages/python/{datetime.now()}.jpg.webp', img)
Difficult part of implementation is kinda over now we just iterate over the filtered objects and set a threshold for the non max suppression. Since same object can be detected by different bounding boxes, we set a threshold to say that okay if the boxes have score of less than something(some value) then treat it as already detected by another box and ignore it.
Lastly, we put a rectangle over the box after suppression , label it with the name of the class nothing fancy there.
Creating A Pipeline
def image_detect(img_path):
    model, classes, colors, output_layers = load_yolo()
    image, height, width, channels = load_image(img_path)
    blob, outputs = detect_object(image, model, output_layers)
    boxes, confs, class_ids = get_box_dimensions(outputs, height, width)
    draw_labels(boxes, confs, colors, class_ids, classes, image)
Nothing fancy here just a function to wrap all the work in a sequential order.
Java Implementation
Since Java is a typed languages there are grater level of complexities. Firstly, there are no tools to download OpenCV’s dependencies. You have to download the .jar file and set it to the path variable manually . In Java referencing multi dimensional arrays are demanding. Never the less lets, get started.
Importing Libraries
In comparison to python there are more lines of code to be written in java(*Why Java Why).
import org.opencv.core.*;
import org.opencv.dnn.Dnn;
import org.opencv.dnn.Net;
import org.opencv.imgcodecs.Imgcodecs;
import org.opencv.imgproc.Imgproc;

import java.io.File;
import java.io.FileNotFoundException;
import java.util.ArrayList;
import java.util.List;
import java.util.Scanner;
Here we import the OpenCv’s DNN library after configuring our project to detect opencv.jar file as a dependencies.
Since Java follows Class and Object relation , we will be working with a class namely Vision for the sake of simplicity.
Defining Some Globals
private final String model_weights;
private final String model_config;
private final String current_dir;
private final String class_file_name_dir;
private final String output_path;
private final List<String> classes;
private final List<String> output_layers;
private String input_path;
private List<String> layer_names;
private Net network;
private Size size;
private Integer height;
private Integer width;
private Integer channels;
private Scalar mean;
private Mat image;
private Mat blob;
private List<Mat> outputs;
private List<Rect2d> boxes;
private List<Float> confidences;
private List<Integer> class_ids;
private String outputFileName;
private boolean save;
private boolean errors;
That’s a lot of variables with global scope. Yes, but never-mind.
Defining Constructor
public Vision(String inputPath, String outputPath, Integer image_size, String outputFileName) {
    System.loadLibrary(Core.NATIVE_LIBRARY_NAME);
    this.input_path = inputPath;
    this.output_path = outputPath;
    this.outputFileName = outputFileName;
    boxes = new ArrayList<>();
    classes = new ArrayList<>();
    class_ids = new ArrayList<>();
    layer_names = new ArrayList<>();
    confidences = new ArrayList<>();
    double[] means = {0.0, 0.0, 0.0};
    mean = new Scalar(means);
    output_layers = new ArrayList<>();
    size = new Size(image_size, image_size);
    current_dir = System.getProperty("user.dir");
    model_weights = current_dir + "/Assets/models/yolov3-608.weights";
    model_config = current_dir + "/Assets/models/yolov3-608.cfg";
    class_file_name_dir = current_dir + "/Assets/models/coco.names";
    save = true;

}
Since, Java fancies class and object, we initialize some variables while creating an instance of the class so that it can be accessed in the future.
Here, as usual we define the location of the config, weights and class names.
Implementing Some Non Python Function
private static int argmax(List<Float> array) {
    float max = array.get(0);
    int re = 0;
    for (int i = 1; i < array.size(); i++) {
        if (array.get(i) > max) {
            max = array.get(i);
            re = i;
        }
    }
    return re;
}
In python, numpy provided this function as an inbuilt , not same applies for Java(*ugh).
Loading Classes
private void setClasses() {
    try {
        File f = new File(class_file_name_dir);
        Scanner reader = new Scanner(f);
        while (reader.hasNextLine()) {
            String class_name = reader.nextLine();
            classes.add(class_name);
        }
    } catch (FileNotFoundException e) {
        errors = true;
    }
}
Nothing fancy just huge lines of code to read a file.
Loading Network
private void setNetwork() {
    network = Dnn.readNet(model_weights, model_config);
}
Same as before , Loading the neural network form config and weight file. Thanks to OpenCv’s DNN library.
Setting Unconnected Layers
private void setUnconnectedLayers() {

    for (Integer i : network.getUnconnectedOutLayers().toList()) {
        output_layers.add(layer_names.get(i - 1));
    }
}
Setting Layer Names
private void setLayerNames() {
    layer_names = network.getLayerNames();
}
Again nothing extraordinary , all we did is split the process of setting unconnected layer and setting layer names.
Loading Image
private void loadImage() {
    Mat img = Imgcodecs.imread(input_path);
    Mat resizedImage = new Mat();
    Imgproc.resize(img, resizedImage, size, 0.9, 0.9);
    height = resizedImage.height();
    width = resizedImage.width();
    channels = resizedImage.channels();
    image = resizedImage;
}
Here comes the interesting part. In python, we had array manipulation library like numpy , but in Java similar concept is reflected with Mat(). In brief it is numpy for Java(*lol).
Mat() are considered to be faster than referencing a normal multi dimensional array.
Detecting Objects
private void detectObject() {
    Mat blob_from_image = Dnn.blobFromImage(image, 0.00392, size, mean, true, false);
    network.setInput(blob_from_image);
    outputs = new ArrayList<Mat>();
    network.forward(outputs, output_layers);
    blob = blob_from_image;
}
This might look familiar to python’s implementation. All we did was read an image (in Mat() or Matrix format),feed it through the neural network and Saved the output of the NN to another matrix variable.
Getting Box Dimensions
private void getBoxDimensions() {
    for (Mat output : outputs) {

        for (int i = 0; i < output.height(); i++) {
            Mat row = output.row(i);
            MatOfFloat temp = new MatOfFloat(row);
            List<Float> detect = temp.toList();
            List<Float> score = detect.subList(5, 85);
            int class_id = argmax(score);
            float conf = score.get(class_id);
            if (conf >= 0.4) {
                int center_x = (int) (detect.get(0) * width);
                int center_y = (int) (detect.get(1) * height);
                int w = (int) (detect.get(2) * width);
                int h = (int) (detect.get(3) * height);
                int x = (center_x - w / 2);
                int y = (center_y - h / 2);
                Rect2d box = new Rect2d(x, y, w, h);
                boxes.add(box);
                confidences.add(conf);
                class_ids.add(class_id);

            }

        }

    }
}
The intuition of getting the boxes dimensions are the same, only the length of the code and data structures are different.
Drawing Labels
private void drawLabels() {
    double[] rgb = new double[]{255, 255, 0};
    Scalar color = new Scalar(rgb);
    MatOfRect2d mat = new MatOfRect2d();
    mat.fromList(boxes);
    MatOfFloat confidence = new MatOfFloat();
    confidence.fromList(confidences);
    MatOfInt indices = new MatOfInt();
    int font = Imgproc.FONT_HERSHEY_PLAIN;
    Dnn.NMSBoxes(mat, confidence, (float) (0.4), (float) (0.4), indices);
    List indices_list = indices.toList();
    for (int i = 0; i < boxes.size(); i++) {
        if (indices_list.contains(i)) {
            if (save) {
                Rect2d box = boxes.get(i);
                Point x_y = new Point(box.x, box.y);
                Point w_h = new Point(box.x + box.width, box.y + box.height);
                Point text_point = new Point(box.x, box.y - 5);
                Imgproc.rectangle(image, w_h, x_y, color);
                String label = classes.get(class_ids.get(i));
                Imgproc.putText(image, label, text_point, font, 1, color);
            }

        }
    }
    if (save) {
        Imgcodecs.imwrite(output_path + "\\" + outputFileName + ".png.webp", image);
    }

}
This might look complex but we are doing same amount of work that we did in python implementation. You can clearly see why python has easy learning curve. We can do far more work in less number of lines. No wonder why it is so popular , because let me tell you a secret “Programmers are lazy” (*lol).
Creating A Pipeline
public void loadPipeline() {
    try {
        setNetwork();
        setClasses();
        setLayerNames();
        setUnconnectedLayers();
        loadImage();
        detectObject();
        getBoxDimensions();
        drawLabels();
    } catch (Exception e) {
        errors = true;
    }

}
Finally, a public method that wraps all the work. It really amazed me how python can do much more with far less code. Contrary it might be slow but as we all know “In Java Program Runs Faster, But in Python Programmers Work Faster”.


Final Words
Gurzu is a software development company passionate about building software that solves real-life problems. Explore some of our awesome projects in our success stories.
Need help with web application development for your dream project? Gurzu engineers can help you! Drop us a message.
Have a tech idea that you need help turning into reality? Book a free consulting session with us!
